A lead magnet can make a huge difference in your blogging business. A great lead magnet attracts the right people into your business, and since these people are added to your email list, they can be contacted with promotional offers of your premium products and services.
What is a lead magnet?
A lead magnet is, at its core, anything of value that you can exchange for your readers’ contact details, mainly their email addresses and phone numbers.
A lead magnet makes your work easier as a content strategist and is a great way to capture leads and turn them into customers. In today’s world, getting your readers’ email addresses is a hard a task, unless you are offering something of value to them in exchange.
Some of the Lead Magnet Ideas You Can Offer
Lead magnets should be brief and to the point. It should offer a quick solution to your readers’ problems. That means you need to know your audience deeply in order to develop a winning freebie. Some of the formats that you can use include the following:
- Free report
- An EBook
- A checklist
- workbook
- A resource list
- A planner
- An email course
- Video series
- Discount offers
- Free templates
- Ultimate guides/tutorials etc.
How to Create a Winning Lead Magnet
1: Listen to your audience
A winning lead magnet solves a particular problem. Thus, your lead magnet should only target a particular group of people. As a blogger, you may have sub audience profiles. You need to create a freebie for each of these profiles. For instance, at The Penny Matters, we have four sub-profiles: Bloggers, Freelancers, Authors, Marketers and Online Business personnel, though our main audience profile is content creators.
In this case, we have a lead magnet that suits our general audience, content creators, and then we have others that are sub-profile specific. For instance, our blogging guide is targeting content creators who run and manage their blogs, while our self-publishing checklist targets content creators who are self-publishing their books.
By listening to your readers, you will be able to tell what they need. When they visit your homepage, where do they go to next, what category of posts do they read on your website? Scan through the comments they leave on your website, as they give you a hint on what you need to create.
If a majority of your traffic comes from Facebook groups, you need to spend more time there. Read the questions they are asking, finding out what is common and create something along that line.
2. Brainstorm opt-in ideas.
After you’ve listened to your audience, take time to brainstorm and generate lead magnet ideas. It’s not uncommon for content creators to do their research well, yet end up creating something that’s totally off.
Remember, it’s not what you want to create, it’s what your readers want. Stick to that as much as you can.
3. Decide on the format.
Different op-tin ideas are better put in some formats than in others. A tutorial is well expressed as a video and a list of tools as a resource pdf or a toolkit.
4. Create Your Lead Magnet
It’s now time to put your lead magnet together. Do deep research and express your ideas in the simplest term possible. Format your files accordingly. Use bulletins, headings, graphics and subheadings. Convert to appropriate formats and make sure they are working.
Also, ensure your lead magnet is small in size. If your final copy of your pdf freebie is quite large, you may want to compress it using some free online pdf compressors. You want, however, to retain the quality of your designs as much as possible
5. Make it look pretty.
Create stunning graphics for interior layout. Find a professional to create a cover that stands out. When naming your freebie, take your time. You can come up with several options and do A/B testing on social media to see which one seems to be getting more traction than the other, and stick to that particular one.
6. Uploading and Automation
Sign up with an email marketing platform of your choice. There are several options such as Aweber, Mailerlite, ConvertKit, MailChimp, Campaign Monitor etc.
In this section, we are going to use Mailerlite, because it’s affordable and quite easy to use.
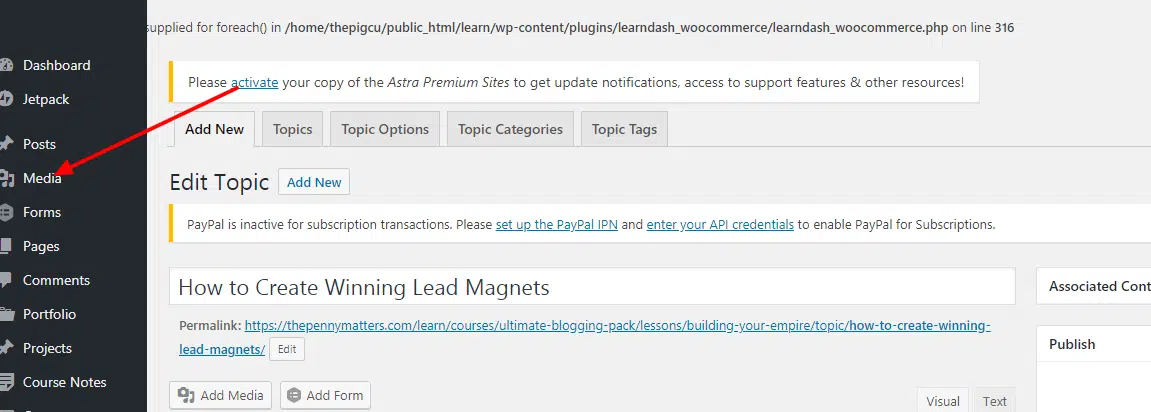
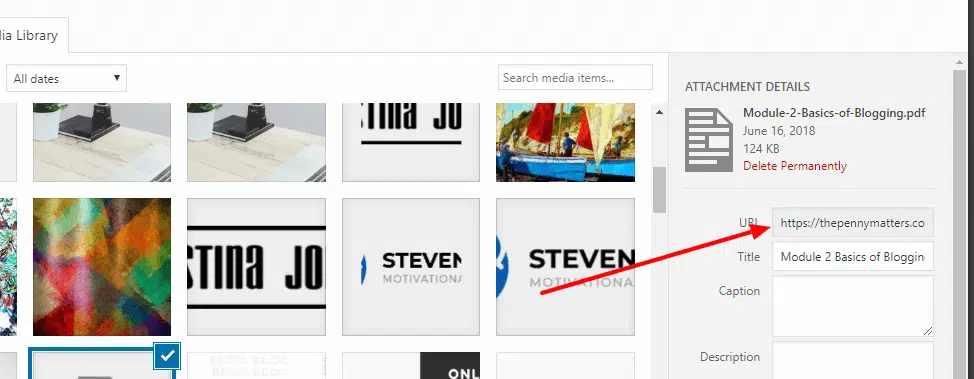
Once your lead magnet is ready, upload it to your website. If you are using WordPress management system, you can easily go to the left sidebar, go to media and click to add one file. If your lead magnet is a video, you need to upload to video managements platforms such as YouTube and leave them as unlisted.

After you have uploaded your file, you need to copy the URL of your file. This is the url you will include it in the email copy that will be sent to your subscribers after they have submitted their email addresses.

Now proceed to Mailerlite, login to your account or signup if you don’t have an account yet. You need to go to subscribers and create a new group and name it something related to your offer, e.g “Free Freelancing Guide”
Now create an opt-in form with Mailerlite. You can follow the tutorial below to learn how to create a form with Mailerlite:
After successfully creating your form, you will see the code that looks like:
<div class="ml-form-embed"
data-account="817495:a4w6q3r3d0"
data-form="958588:z8a4k8"> </div>
Copy this code and paste it on the page where you want people to download your freebie. The form will be embedded on the page
Then go ahead to create Automation on your Mailerlite. Go to automation then Add new workflow and name it something similar to “Free Freelancing Guide Downloads.” You will need to add a new trigger to your workflow, choose “when a subscriber joins a group” then choose the group you created above, that is, “Free Freelancing Guide”
Then add a new step by pressing the plus button down the workflow, choose to add “Email” then follow the tutorial below:
When designing the email in your final step, hyperlink the url file you created on your WordPress file with the Download Now link on your email.
This is what happens after you have successfully created the workflow:
A reader subscribes to download your guide from a page with an optin form. He is added to the group “Free Freelancing Guide” and the automation “Free Freelancing Guide Downloads” is activated, and the email with download link is immediately sent to your subscriber’s email address.


